!wget https://s3-us-west-1.amazonaws.com/udacity-aind/dog-project/dogImages.zip
!unzip -qo dogImages.zip
!rm dogImages.zipDog Breed Classification
This example is based on a very popular Udacity project, upgraded to use TensorFlow 2.3.0 with GPU accelaration. The goal is to classify images of dogs according to their breed.
In this notebook, we take the first steps towards developing an algorithm that could be used as part of a mobile or web app. At the end of this project, our code will accept any user-supplied image as input. If a dog is detected in the image, it will provide an estimate of the dog’s breed. In this real-world setting, we will piece together a series of state-of-the-art computer vision models to perform different tasks (Dog detection -> Breed classification).
Table of contents
We break the notebook into separate steps. Feel free to use the links below to navigate the notebook.
- Step 0: Download Datasets and Install Dependencies
- Step 1: Import Datasets
- Step 2: Detect Dogs
- Step 3: Create a CNN to Classify Dog Breeds (from Scratch)
- Step 4: Create a CNN (VGG16) to Classify Dog Breeds (using Transfer Learning)
- Step 5: Create a CNN (ResNet-50) to Classify Dog Breeds (using Transfer Learning)
- Step 6: Write your Own Dog Classifier
- Step 7: Test Your Classifier
## Step 0: Download Datasets and Install Dependencies
For this task we use TensorFlow 2.3.0, as well as a few helper libraries like Pillow. Also, we need to download and extract the dataset we will use to train our classifier.
Download the dataset
The dataset is available here. The following cell downloads it as a zip file, extracts it and moves it to the corresponding folder. Finally, it removes the zip file.
Install dependencies
The task requires Pillow the friendly PIL fork by Alex Clark and Contributors. PIL is the Python Imaging Library by Fredrik Lundh and Contributors. Below, we install the Pillow package using pip.
!pip3 install --user -r requirements/requirements-v2.txtImport the necessary libraries
We use Tensorflow 2.3.0 to build and train our dog breed classifier. We also need Pillow to load the images in memory, which we specifically instruct to load any truncated images also.
import os
import numpy as np
import tensorflow as tf
import matplotlib.pyplot as plt

from tensorflow.keras.preprocessing.image import ImageDataGenerator

from glob import glob
from PIL import Image
from PIL import ImageFile


ImageFile.LOAD_TRUNCATED_IMAGES = Trueprint(f"Version of TensorFlow in use: {tf.__version__}")
print(f"Using GPU device: {tf.config.list_physical_devices('GPU')}")First, let us define the pipeline-parameters cell. We use it to define the hyperparametes we would like to tune later. These variables will be converted to KFP pipeline parameters, so we should make sure they are used as global variables throughout the notebook.
LR = 6e-4
BATCH_SIZE = 32
NUMBER_OF_NODES = 256
EPOCHS = 4
IMG_SIZE = 224
Processing the Dataset
We use TensorFlow native generators to load and transform the data. Pay attention to the train_datagen which also includes several transformations to augment our dataset (e.g. width and height shift, brightness alterations and horizontal flip). These transformations are taking place in memory, leaving the original data untouched.
def get_train_generator():
    data_datagen = ImageDataGenerator(
        rescale=1./255,
        width_shift_range=.2,
        height_shift_range=.2,
        brightness_range=[0.5,1.5],
        horizontal_flip=True
    )
    return data_datagen.flow_from_directory(
        "dogImages/train/",
        target_size=(int(IMG_SIZE), int(IMG_SIZE)),
        batch_size=int(BATCH_SIZE),

    )

def get_valid_generator():
    data_datagen = ImageDataGenerator(rescale=1./255)
    return data_datagen.flow_from_directory(
        "dogImages/valid/",
        target_size=(int(IMG_SIZE), int(IMG_SIZE)),
        batch_size=int(BATCH_SIZE)
    )

def get_test_generator():
    data_datagen = ImageDataGenerator(rescale=1./255)
    return data_datagen.flow_from_directory(
        "dogImages/test/",
        target_size=(int(IMG_SIZE), int(IMG_SIZE)),
        batch_size=int(BATCH_SIZE)
)In this section, we use a pre-trained ResNet V2 model to detect dogs in images. First, we download a pretrained ResNet-50 model on ImageNet, a very large, very popular dataset used for image classification and other computer vision tasks. ImageNet contains over 10 million URLs, each linking to an image containing an object from one of 1000 categories. Given an image, this pre-trained ResNet-50 model returns a prediction (derived from the available categories in ImageNet) for the object that is contained in the image.
dog_classifier = tf.keras.applications.ResNet50V2(
    weights="imagenet",
    input_shape=(int(IMG_SIZE), int(IMG_SIZE), 3)
)
The categories corresponding to dogs appear in an uninterrupted sequence referring to dictionary keys 151-268, inclusive, to include all categories from ‘Chihuahua’ to ‘Mexican hairless’. Thus, in order to check if an image is predicted to contain a dog by the pre-trained ResNet model, we need only check if the function below returns a value between 151 and 268 (inclusive).
We use these ideas to complete the is_dog function below, which returns True if a dog is detected in an image.
def is_dog(data):
    probs = dog_classifier.predict(data)
    preds = tf.argmax(probs, axis=1)
    return ((preds >= 151) & (preds <= 268))
To test the classifier we request a batch from our training data generator and feed it through the network. The accuracy, as expected, is really high.
train_generator = get_train_generator()
batch = train_generator.next()
predictions = is_dog(batch[0])
n_dog = np.sum(predictions)
dog_percentage = n_dog/int(BATCH_SIZE)
print('{:.0%} of the files have a detected dog'.format(dog_percentage))## Step 3: Create a CNN to Classify Dog Breeds (from Scratch)
Now that we have a function for detecting dogs in images, we need a way to predict the dog breed from images. In this step, you will create a CNN that classifies dog breeds. We should be careful with adding too many trainable layers though. More parameters means longer training and you may also fall in the trap of overfitting. Thankfully, tf.keras provides a handy estimate of the time that each epoch is likely to take; you can extrapolate this estimate to figure out how long it will take for your algorithm to train.
We mention that the task of assigning breed to dogs from images is considered exceptionally challenging. To see why, consider that even a human would have great difficulty in distinguishing between a Brittany and a Welsh Springer Spaniel.
| Brittany | Welsh Springer Spaniel |
|---|---|
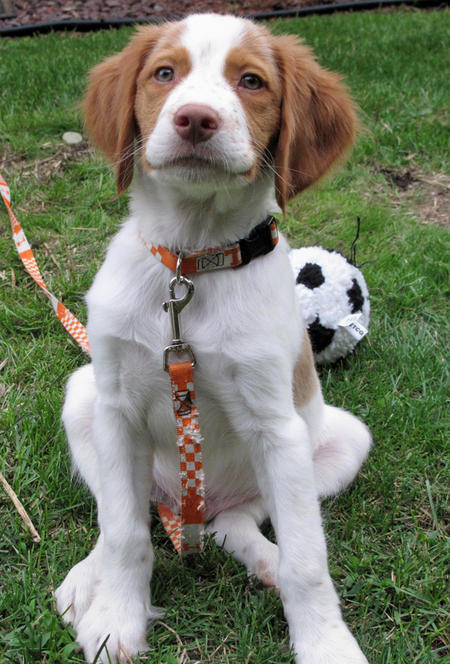 |
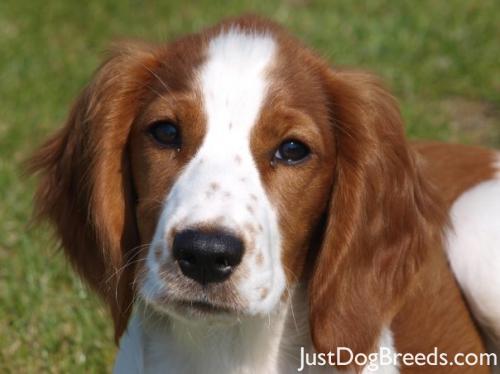 |
It is not difficult to find other dog breed pairs with minimal inter-class variation (for instance, Curly-Coated Retrievers and American Water Spaniels).
| Curly-Coated Retriever | American Water Spaniel |
|---|---|
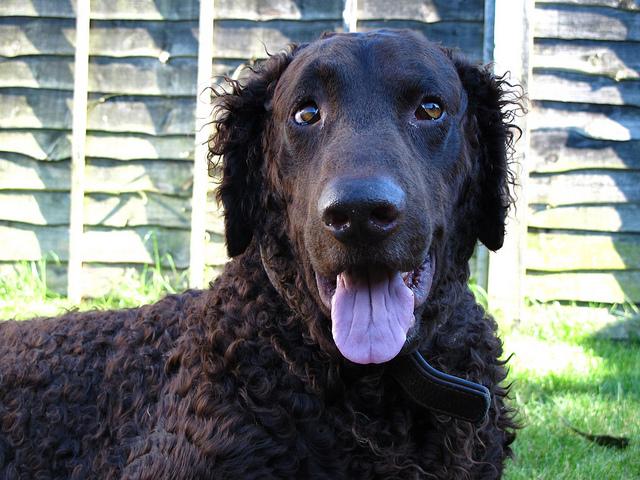 |
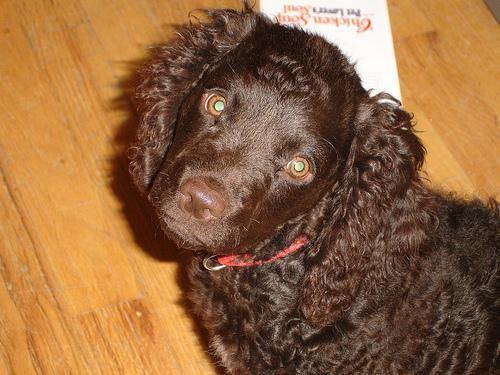 |
Likewise, recall that labradors come in yellow, chocolate, and black. Your vision-based algorithm will have to conquer this high intra-class variation to determine how to classify all of these different shades as the same breed.
| Yellow Labrador | Chocolate Labrador | Black Labrador |
|---|---|---|
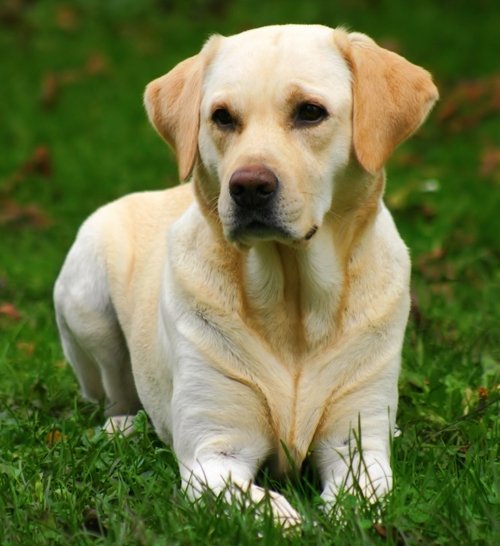 |
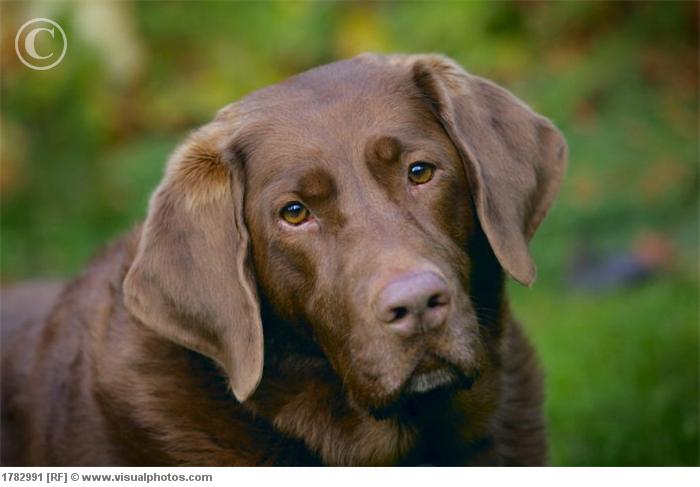 |
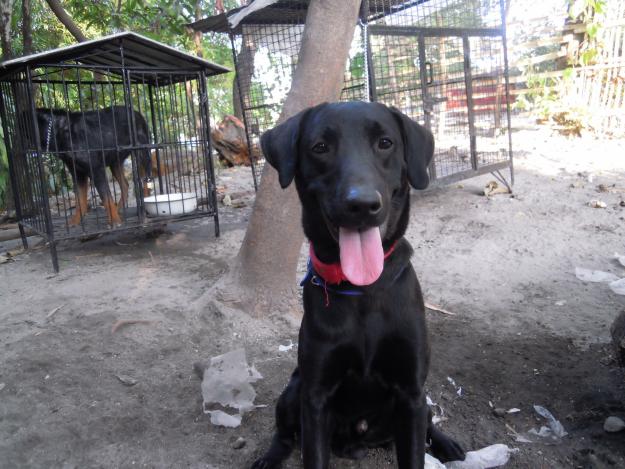 |
We also mention that random chance presents an exceptionally low bar: setting aside the fact that the classes are slightly imabalanced, a random guess will provide a correct answer roughly 1 in 133 times, which corresponds to an accuracy of less than 1%.
Model architecture
Create a CNN to classify dog breed. At the end of your code cell block, summarize the layers of your model by executing model.summary().
model = tf.keras.models.Sequential([
    tf.keras.layers.Conv2D(16, 3, activation="relu", input_shape=(int(IMG_SIZE), int(IMG_SIZE), 3)),
    tf.keras.layers.MaxPool2D(),
    tf.keras.layers.Conv2D(32, 3, activation="relu"),
    tf.keras.layers.MaxPool2D(),
    tf.keras.layers.Conv2D(64, 3, activation="relu"),
    tf.keras.layers.MaxPool2D(),
    tf.keras.layers.GlobalAveragePooling2D(),
    tf.keras.layers.Dense(int(NUMBER_OF_NODES), activation="relu"),
    tf.keras.layers.Dense(133, activation="softmax")
])model.summary()The next step is to compile the model. For this, we need to pass an optimizer and a loss function. We can also pass a list of metrics we want. In this example, we pass the accuracy metric.
model.compile(
    optimizer=tf.optimizers.Adam(learning_rate=float(LR)),
    loss=tf.losses.categorical_crossentropy,
    metrics=["accuracy"]
)
Finally, we can train the model using the fit method. This runs on batches yielded by the data generator and prints out the loss and accuracy both for train and validation sets.
train_generator = get_train_generator()
valid_generator = get_valid_generator()

tb_callback = tf.keras.callbacks.TensorBoard(log_dir="custom_classifier_logs")

model.fit(train_generator, epochs=2,
    validation_data=valid_generator,
    callbacks=[tb_callback]
)
Evaluation
To evaluate the final model we feed it with the test dataset and call the evaluate method.
test_generator = get_test_generator()

model.compile(
    optimizer=tf.optimizers.Adam(learning_rate=float(LR)),
    loss=tf.losses.categorical_crossentropy,
    metrics=["accuracy"]
)

test_loss_custom, test_accuracy_custom = model.evaluate(test_generator)

print(f"The accuracy in the test set is {test_accuracy_custom:.3f}.")
## Step 4: Create a CNN (VGG16) to Classify Dog Breeds (using Transfer Learning)
To reduce training time without sacrificing accuracy, we train a CNN using Transfer Learning. Transfer Learning is the fine-tuning of a network that was pre-trained on some big dataset with new classification layers. The idea behind is that we want to keep all the good features learned in the lower levels of the network (because there’s a high probability the new images will also have those features) and just learn a new classifier on top of those. This tends to work well, especially with small datasets that don’t allow for a full training of the network from scratch (it’s also much faster than a full training).
One way of doing Transfer Learning is by loading a pretrained model up to a point, usually chopping off the final dense part of the model and adding a fully connected layer with the output that we want (e.g. an 133-node classifier). Then, we freeze the first part of the model (i.e. the body) and train only the final layer we added.
vgg_body = tf.keras.applications.VGG16(
    weights="imagenet",
    include_top=False,
    input_shape=(int(IMG_SIZE), int(IMG_SIZE), 3)
)
vgg_body.trainable = Falseinputs = tf.keras.layers.Input(shape=(int(IMG_SIZE), int(IMG_SIZE), 3))
# We make sure that the vgg_body is running in inference mode here,
# by passing `training=False`. This is important for fine-tuning, as you will
# learn in a few paragraphs.
x = vgg_body(inputs, training=False)
# Convert features of shape `vgg_body.output_shape[1:]` to vectors
x = tf.keras.layers.GlobalAveragePooling2D()(x)
# A Dense classifier (categorical classification)
outputs = tf.keras.layers.Dense(133, activation="softmax")(x)
vgg_model = tf.keras.Model(inputs, outputs)vgg_model.summary()vgg_model.compile(
optimizer=tf.optimizers.Adam(learning_rate=float(LR)),
loss=tf.losses.categorical_crossentropy,
metrics=["accuracy"]
)train_generator = get_train_generator()
valid_generator = get_valid_generator()
vgg_model.fit(train_generator, epochs=2,
validation_data=valid_generator
)Evaluation
To evaluate the model on the test set we call the same evaluate method.
test_generator = get_test_generator()
vgg_model.compile(
    optimizer=tf.optimizers.Adam(learning_rate=float(LR)),
    loss=tf.losses.categorical_crossentropy,
    metrics=["accuracy"]
)
test_loss_vgg, test_accuracy_vgg = vgg_model.evaluate(test_generator)
print(f"The accuracy in the test set is {test_accuracy_vgg:.3f}.")## Step 5: Create a CNN (ResNet-50) to Classify Dog Breeds (using Transfer Learning)
In this section, we will use the same procedure but with a pretrained ResNet-50 model.
resnet_body = tf.keras.applications.ResNet50V2(
    weights="imagenet",
    include_top=False,
    input_shape=(int(IMG_SIZE), int(IMG_SIZE), 3)
)
resnet_body.trainable = Falseinputs = tf.keras.layers.Input(shape=(int(IMG_SIZE), int(IMG_SIZE), 3))
# We make sure that the vgg_body is running in inference mode here,
# by passing `training=False`. This is important for fine-tuning, as you will
# learn in a few paragraphs.
x = resnet_body(inputs, training=False)
# Convert features of shape `vgg_body.output_shape[1:]` to vectors
x = tf.keras.layers.Flatten()(x)
# A Dense classifier (categorical classification)
outputs = tf.keras.layers.Dense(133, activation="softmax")(x)
resnet_model = tf.keras.Model(inputs, outputs)resnet_model.compile(
optimizer=tf.optimizers.Adam(learning_rate=float(LR)),
loss=tf.losses.categorical_crossentropy,
metrics=["accuracy"]
)train_generator = get_train_generator()
valid_generator = get_valid_generator()
resnet_model.fit(train_generator, epochs=int(EPOCHS),
validation_data=valid_generator
)Evaluation
test_generator = get_test_generator()
resnet_model.compile(
    optimizer=tf.optimizers.Adam(learning_rate=float(LR)),
    loss=tf.losses.categorical_crossentropy,
    metrics=["accuracy"]
)
test_loss_resnet, test_accuracy_resnet = resnet_model.evaluate(test_generator)
print(f"The accuracy in the test set is {test_accuracy_resnet:.3f}.")## Step 6: Write your Own Dog Classifier
To create our own classifier we need a class to predict if there is a dog in the image and if that’s true, return the breed. For the first part we use the dog_classifier method and then predict the breed using the predict_breed method.
idx_to_class = {value: key for key, value in train_generator.class_indices.items()}

def predict_breed(images):
    probs = resnet_model.predict(images)
    pred = tf.argmax(probs, axis=1)
    label = idx_to_class[pred.numpy()[0]]
    return label.split(".")[-1]
def predict_dog(image):
image = image[None,...]
if is_dog(image):
pred = predict_breed(image)
print(f"This photo looks like a(n) {pred}.")
return
print("No dog detected")
image = train_generator.next()[0][0]
plt.imshow(image)
plt.show()
pred = predict_dog(image)## Step 7: Test Your Classifier
In the last section, we take your new algorithm for a spin; if you have a dog, does it predict your dog’s breed accurately? If you have a cat, does it mistakenly think that your cat is a dog?
for img_path in sorted(glob("check_images/*")):
    print(img_path)
    img = Image.open(img_path)
    img = img.resize((224, 224))

    plt.imshow(img)
    plt.show()

    img = np.array(img)
    predict_dog(img)
Pipeline metrics
This is the pipeline-metrics cell. Use it to define the pipeline metrics that KFP will produce for every pipeline run. Kale will associate each one of these metrics to the steps that produced them. Also, you will have to choose one these metrics as the Katib search objective metric.
print(test_accuracy_resnet)